Cloud chambers are one of the most beautiful ways to see ionising radiation. After wanting one for a long time, I built a compact version based on Peltier cooling, using mostly off-the-shelf components and an old PC power supply.
Below I explain the design, the physics behind it, and a few practical lessons learned.
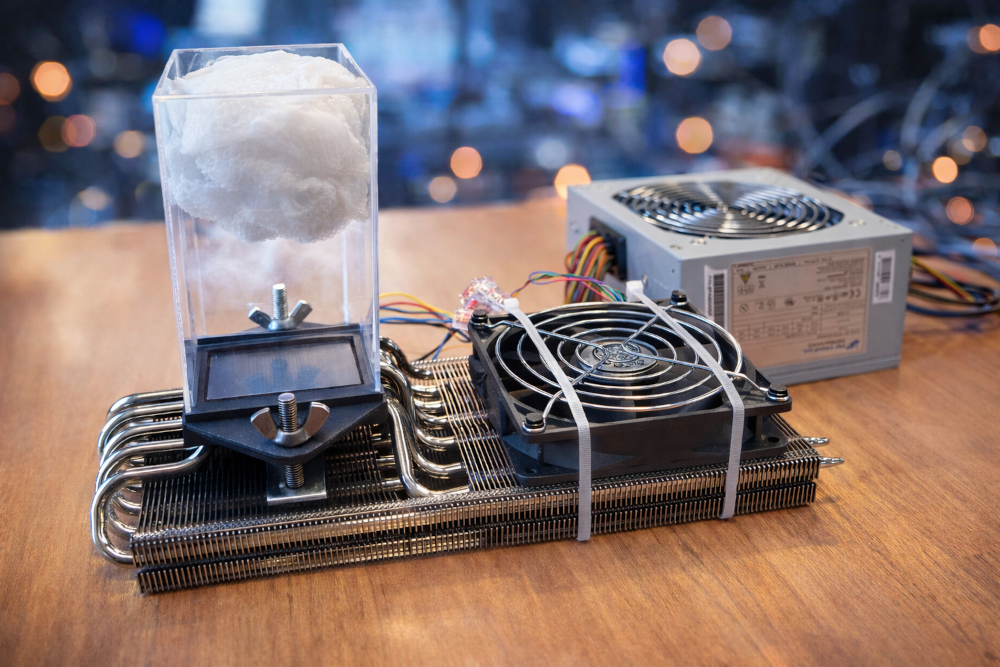
The Design
The chamber is built around a two-stage Peltier cooling stack designed to reach sufficiently low temperatures on a graphite plate, where the particle tracks become visible.
Main components
- Acrylic (plexiglass) box — the enclosure where the vapor supersaturation occurs
- Graphite plate — the cold surface where condensation tracks form
- Two Peltier modules in series — create the temperature gradient
- Heat sink with fan — removes heat from the hot side
- Paper soaked with isopropyl alcohol — vapor source
- PC power supply — provides the high current required
Why Two Peltier Modules?
To reach low temperatures efficiently, the system uses two Peltiers stacked thermally:
- Lower Peltier (hot side → heat sink)
- Optimal voltage: ~16 V
- Current: ~7 A
- Purpose: remove most of the heat
- Upper Peltier (cold side → graphite plate)
- Optimal voltage: ~3 V
- Purpose: fine cooling of the plate
This configuration creates a strong temperature gradient while keeping the graphite plate stable.
Power supply choice
The optimal voltages are not standard, so instead of a dedicated lab supply I used an old PC power supply:
- Provides high current reliably
- Readily available and portable
- Outputs only fixed rails (12 V and 3.3 V)
Although not ideal, this setup still cools the graphite plate to about −30 °C (-25 °C is the temperature for the alcohol to be in the supersaturated state), which is sufficient for cloud chamber operation.
How an Alcohol Cloud Chamber Works
Inside the acrylic box, a strip of paper soaked in isopropyl alcohol continuously evaporates, filling the chamber with vapor.
Because the bottom graphite plate is very cold while the top is warmer, a supersaturated layer forms near the plate.
When a charged particle passes through this region, it ionises the vapor along its path.
The ions act as nucleation centers, causing tiny droplets to condense — making the particle’s trajectory visible as a thin white track.
Observing Particle Tracks
With no radioactive source, the chamber still works — but the rate is low.
In my setup:
- Typical waiting time for a clear track: a couple of minutes
- Most visible tracks are likely alpha particles
When a small radioactive source is placed nearby, the track rate increases dramatically, making the chamber much more visually engaging.
What Makes This Build Interesting
Compared to many DIY cloud chambers:
- Uses Peltier cooling instead of dry ice
- Powered by a repurposed PC power supply
- Compact and portable
- Demonstrates that precise lab supplies are helpful but not strictly necessary
Final Thoughts
This project sits at a nice intersection of physics, electronics, and hands-on making.
Even with non-ideal voltages, reaching −30 °C on the graphite plate is enough to reliably visualise radiation — turning an invisible phenomenon into something tangible.
It’s a reminder that with a bit of ingenuity (and a spare power supply), you can build real particle detectors on a desk.
Credits: first time I saw a Peltier cloud chamber was in a presentation done by a Japanese colleague in a conference in Tokyo
Leave a Reply